Set up email from your own domain
Connect your email provider, verify a domain, publish DMARC, send a test and set a monthly limit — all before HyperDM can send any email.
HyperDM can email the people on your list — but only from your domain, through your own email provider account. That is deliberate: your sending reputation stays yours, nothing you send is mixed in with another business's mail, and you are never one stranger's bad list away from having your email stopped.
You set it up on the Customer email card in Settings → Channels. The card lists seven steps — Provider key, Sending domain, DNS records, DMARC, From address, Delivery events and Ready to send — and marks each one Done, Now or Waiting. The sections below follow the same order, then add the monthly limit. Nothing can be sent until every step is done and a monthly limit is set.
Where it's on: email is being turned on workspace by workspace. If Settings → Channels has a Customer email card, it's on for yours. It's on paid plans, Starter and up; on the Free plan the card says Not on your plan — see plans-and-billing.md.
Who can set it up: owners and admins (the "manage connections" permission). Setting the monthly limit needs the billing permission, which only the workspace owner has. Everyone else sees the card and its progress, without the controls — see roles-and-permissions.md.
What you need before you start
- A Resend account of your own. Free to create. HyperDM does not create it for you, and reaches it only through the key you paste: to check your domain, set up delivery updates and send your emails.
- A domain you control the DNS for — and ideally a subdomain of it, like
mail.yourshop.comrather thanyourshop.com. A subdomain keeps your main domain's reputation separate from your marketing mail, so a bad campaign can never affect your invoices or your password resets. - Your business's postal address. Every marketing email is legally required to carry one.
Step 1 — Paste your API key
- In your Resend account, create an API key with full access (a sending-only key can't add a domain).
- In HyperDM, go to Settings → Channels and find the Customer email card.
- Paste the key into Provider API key and press Connect email.
The key is encrypted the moment it arrives and is never shown again — not to you, not to your team, not in an export.
Rotating your key. If you create a new key at Resend, press Replace key on the card, paste it and press Replace key again. The card says what happens before you press it: a new key could belong to a different Resend account, so sending pauses until you press Re-check (step 2), then Connect delivery events (step 5) and Send test (step 6) once more. Pasting the key you already use changes nothing. Replacing the key does not cancel anything — only Disconnect does that — but a campaign that was sending at that moment stops as Paused, and does not carry on by itself: once the card says Ready again, open the campaign and press Resume.
Step 2 — Add your sending domain
- Type the domain you want to send from into Sending domain and press Add domain.
- The card shows the DNS records to publish — usually three. Each has a Copy button.
- Publish them with whoever hosts your DNS, then come back and press Re-check.
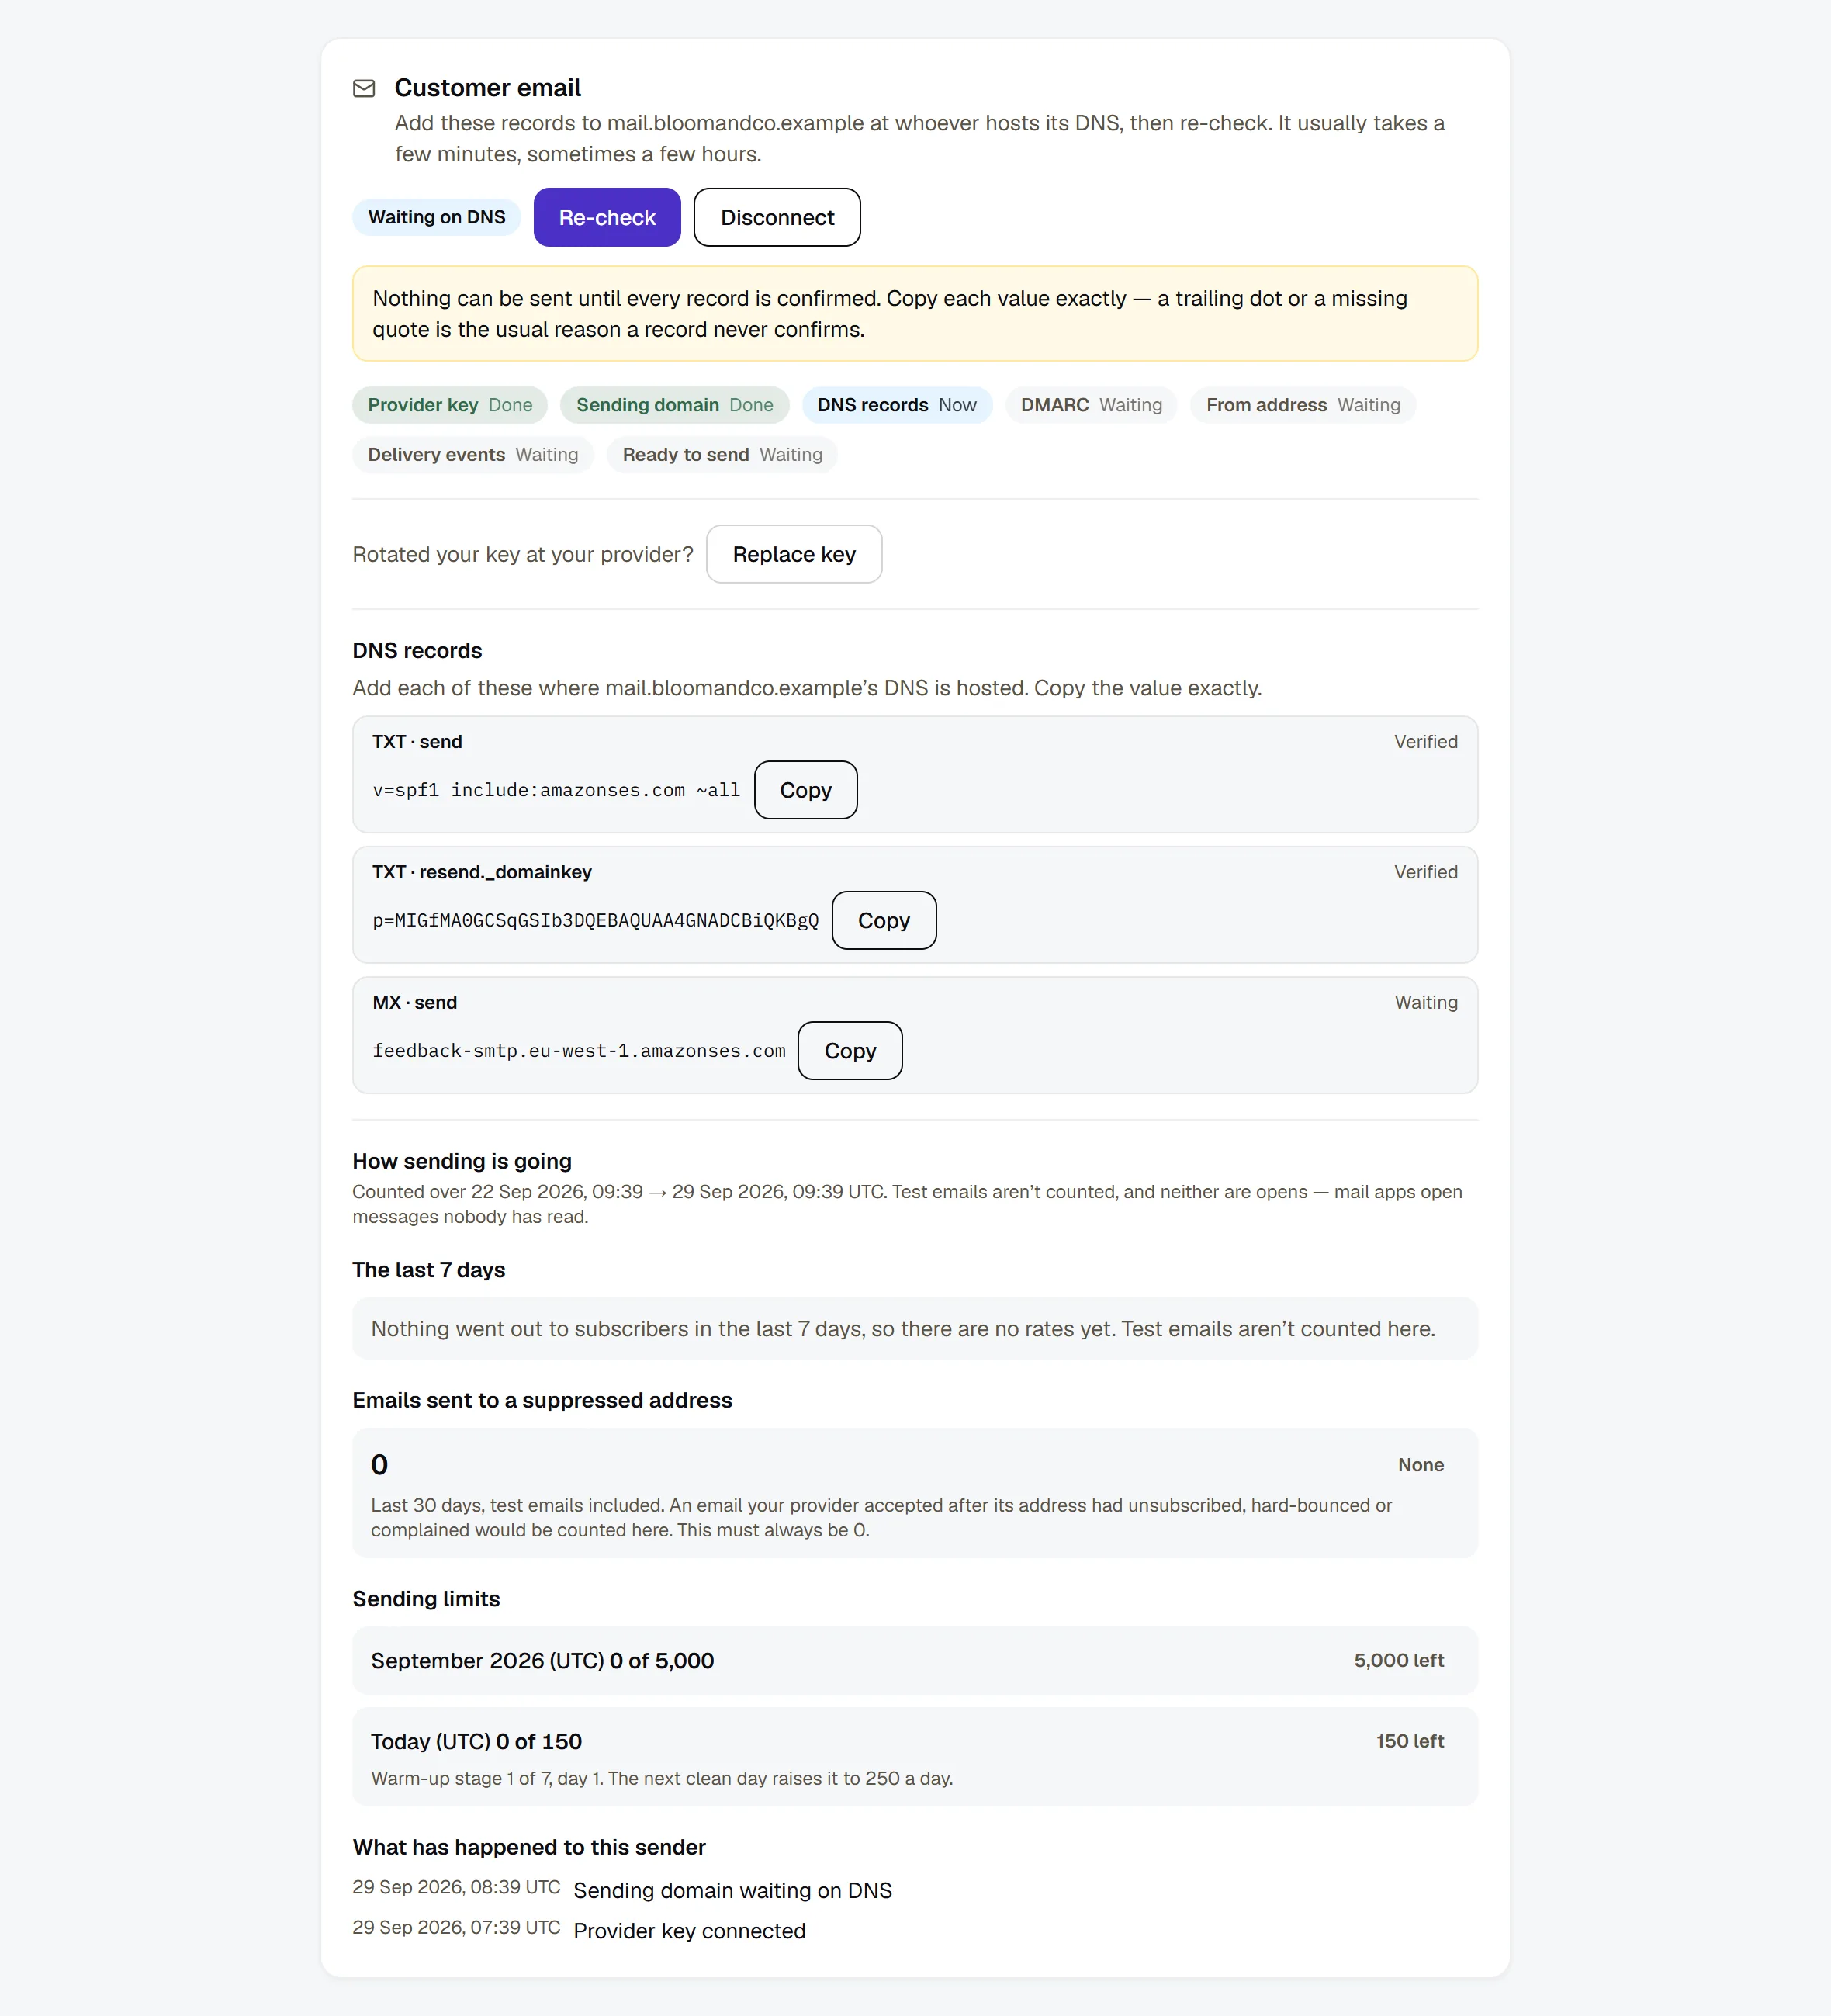
Already sending from that domain with Resend? If the domain is already in the Resend account your key belongs to, HyperDM uses it rather than adding it again — the card says so, and any record already verified shows Verified. If a different Resend account holds the domain, the card says that instead: connect a key from the account that holds it, or remove the domain there first. Your key is fine either way.
Each record says where your provider has got to with it: Verified, Waiting, Retrying or Not found. After a Re-check, each TXT record that isn't confirmed yet also says whether HyperDM can see it in DNS itself — Seen in DNS or Not seen in DNS yet. That is a hint, not the verdict: "not seen yet" usually means the change hasn't spread, and the provider's word is what counts.
The card's badge says where the domain as a whole is:
- Waiting on DNS — the records are being checked, or some are confirmed and some aren't yet. Check any record still marked Waiting or Not found, then press Re-check.
- Re-checking — your provider's check did not complete and it is retrying by itself. Leave your records exactly as they are; there is nothing to fix.
- DNS not found — your provider couldn't find the records. Compare each row on the card with what your DNS host saved.
- DNS expired — the records were confirmed once and aren't any more, usually because they were edited or the DNS moved. Check them and press Re-check.
When every record is verified, the DNS records step says Done.
DNS can take a few minutes or a few hours, depending on your host.
Step 3 — Publish a DMARC record
Gmail, Yahoo and Outlook all require anyone sending bulk email to publish a DMARC record. Without one, your mail is far more likely to land in spam — so HyperDM checks for it and will not let you send until it is there.
Add a TXT record at _dmarc.<your sending domain> with at least:
v=DMARC1; p=nonep=none means "watch, don't block", which is the right place to start. Until the record is there, the card's badge says DMARC needed. Press Re-check and the card confirms it.
Step 4 — Set who the email is from
Fill in:
- From name — what people see in their inbox, like your shop's name.
- From address — the part before the
@, likehello. The domain is the one you verified. - Reply-to (optional) — where replies go; leave it empty and replies go to the from address. HyperDM does not receive replies: they go straight to this mailbox, so use one you read.
- Postal address — your business's physical address. It is added to the footer of every email automatically, because the law requires it.
- Footer note (optional) — one line of your own at the top of the footer, like "You're getting this because you signed up at our shop." Plain text, up to 200 characters, with no links, HTML or merge tags. It is added above your postal address and the Unsubscribe link, which are always there whatever it says. Leave it empty and the footer has no note.
Then press Save sender.
Step 5 — Turn on delivery updates
Press Connect delivery events. This is how HyperDM learns what happened to each email — delivered, bounced, marked as spam, unsubscribed. Without it you would be sending blind.
Step 6 — Send yourself a test
Press Send test on the card. It sends a short built-in email — you don't need to have written a template yet — only to the email address you sign in with, and it does two jobs: it shows you what your setup looks like in a real inbox, and it produces the first delivery update, which is the last thing the card is waiting for.
Test emails don't count against your monthly limit or your daily warm-up limit. Your workspace can send up to 20 a day (counted in UTC), from this card and the campaign editor's Send a test to yourself together. A test is never sent to an address on your do-not-email list.
When your provider reports the test — usually within a minute — the card says Ready. Reload Settings to see it.
Step 7 — Set your monthly limit
Nothing sends until you set one. The Monthly limit field appears on the card from the delivery-events step on. Enter the maximum number of emails this workspace may send in a calendar month and press Save limit. It is a hard ceiling: once it is reached, sending stops until the month rolls over or you raise it. Only the workspace owner can set it, and each change is kept in the workspace's audit log.
This exists so that a mistake — a flow that loops, a list ten times bigger than you thought — costs you a stopped campaign rather than a bill and a damaged domain.
Why your first emails are limited
A brand-new sending domain that suddenly sends thousands of emails looks exactly like a spammer to Gmail and Outlook, and gets treated like one. So HyperDM starts you at 150 emails a day and raises the limit each day your sending is clean:
150 → 250 → 400 → 700 → 1,000 → 1,500 → 2,000, then half as much again each day after.
A day only counts if you actually sent something and your bounces and spam complaints stayed low. You cannot earn a bigger limit by not sending. If a day goes badly, the limit stays where it is until the next clean one.
When you reach the day's limit, the rest of a campaign waits for tomorrow rather than failing. On Broadcasts its row says Paced by your sending domain's warm-up and when the next batch goes out. A flow's email waits the same way. While the card says Ready it shows which warm-up day you're on and today's limit.
Changing your sending domain starts the warm-up again, at 150 a day: the limit you earned belongs to the domain you earned it on, and a new domain has no reputation yet.
If sending gets paused
HyperDM stops your sending by itself if, over the last seven days, 2% or more of your emails hard-bounced or 0.05% or more were marked as spam — judged only once at least 200 emails that week were accepted by your provider. Those are lower thresholds than your provider's own, on purpose: by the time a provider acts, the damage to your domain is already done.
The card's badge says Paused, its message says which one it was, and How sending is going shows the rate against its line. Campaigns that were sending pause too. Sending stays off until someone with the manage-connections permission ticks the box to confirm they've looked at why and presses Resume sending. Before you do, it is worth fixing the cause — usually an old list, or addresses you never had clear permission for. A paused campaign then needs its own Resume — see how-to-send-email.md.
After you resume, HyperDM judges only what you send from then on: the bounces that caused the pause are not counted again, so sending stays on. If the next few hundred emails bounce or are marked as spam the same way, it pauses again.
Checking how sending is going
Once your key is connected, the bottom of the card — How sending is going — reports on your sender, to everyone who can see the card. It fills in a moment after the card appears.
- The last 7 days. How many emails your provider accepted and delivered, and your hard bounce and marked as spam rates, each next to the line where sending pauses (2% and 0.05%) and the numbers it's worked out from. Getting close means you're past half way to a line. Your own test emails aren't counted. Until at least 200 emails in a week were accepted, a single bad address moves a rate a lot, so sending only pauses on its own from 200.
- Emails sent to a suppressed address. Emails your provider accepted after the address had already unsubscribed, hard-bounced or marked you as spam, over the last 30 days, test emails included. This should always be 0. If it isn't, it isn't something you did — contact support.
- Sending limits. This month's emails against your monthly limit, and today's against today's warm-up limit (both in UTC).
- What has happened to this sender. When the key was connected, the domain verified, delivery events confirmed, sending paused or resumed, and how long setup took.
If part of it says We couldn't read, that part wasn't counted — it is not a zero, and your sending isn't affected. Reload in a minute.
Common problems
The DNS step says "Waiting on DNS" or "DNS not found" and won't turn Done. The records must be on the exact hostname the card shows, including the prefix. Some DNS hosts add your domain automatically, which turns mail._domainkey.mail.yourshop.com into …mail.yourshop.com.yourshop.com. Check the full name your host saved.
The card says "DMARC needed" — "no DMARC record" — but I added the record. It has to be at _dmarc.<the domain you're sending from> — if you verified mail.yourshop.com, the record goes at _dmarc.mail.yourshop.com, not at _dmarc.yourshop.com.
The card says it has "a DMARC record we can't read". There is a record there, but it doesn't start with v=DMARC1 or has no p= in it. Fix that record rather than adding a second one — two DMARC records count as none. Copy the line from step 3 exactly.
I can't see the Customer email card. It isn't switched on for your workspace yet. If the card is there but has no buttons or fields, your role can't manage connections — the card says so.
The card says it couldn't load your email settings. HyperDM couldn't read your sender just then. Nothing about your sender changed and nothing was switched off by it — reload the page in a moment.
I pressed Disconnect — what happened to everything? Disconnect asks you to type your sending domain (once you've added one), then press Disconnect email. It stops sending at once, ends every email campaign that hasn't finished (drafts and scheduled ones are cancelled; one that is sending stops), removes the delivery updates it added at your provider and deletes the key HyperDM stored. Your templates, your sending history, your domain and sender details and, most importantly, your unsubscribe list all stay exactly as they are — disconnecting never forgets who asked you to stop. The key itself still works at your provider until you delete it there.
The card says Disconnected, but it still shows a Disconnect button. The disconnect stopped part way through — for example, your unfinished email campaigns couldn't be ended at that moment. Sending stopped at the first step, so nothing is going out, but your key is still stored. Press Disconnect again to finish.
I reconnected — why is it asking me to check my domain and connect delivery events again? Disconnecting also removes the delivery updates from your provider, so after you paste your key again your domain and sender details are still there, but you need to press Re-check, then Connect delivery events and Send test once more. The card says Ready when that test's first update arrives.
The card says "Key stopped working". Your provider refused the key HyperDM has stored — the key was deleted, deactivated or suspended in your Resend account, or it lost the access HyperDM needs. Nothing is sent until you paste a working key into the card and press Connect email. If you paste back the same key (because the change at Resend was undone), the card goes straight back to Ready. Any campaign that was sending when the key stopped working is Paused: press Resume on it once the card is Ready.
The card went back to the DNS step by itself. Your provider stopped treating the domain as verified — usually because a record was removed or changed at your DNS host. HyperDM notices when your provider refuses to send from the domain, and it re-checks a verified domain with your provider once a day. Nothing sends from the domain until it's verified again: fix the records the card shows and press Re-check. This is never about your key, so there's no need to paste it again. A campaign that was sending at the time is Paused — press Resume on it once the card says Ready.
Bounces or unsubscribes stopped showing up. Your provider can switch delivery updates off after trouble reaching HyperDM. Press Reconnect delivery events on the card, confirm, then press Send test: sending pauses until that test's first update arrives, and then the card says Ready again. A campaign that was sending when you reconnected is Paused and doesn't restart by itself — press Resume on it.
The card says Coming soon, with only a Disconnect button. Email has been switched off for your workspace while your key is still stored. Nothing sends. Press Disconnect if you want the key and the delivery updates removed from your provider.
I pasted a new API key — why did the card stop saying Ready? Delivery updates and your domain are set up inside one Resend account, and HyperDM can't tell whether a new key belongs to the same account or a different one. If it were a different one, bounces and spam reports for your emails would never reach HyperDM — so a new key asks you to press Re-check, then Connect delivery events and Send test. If the Re-check says your provider doesn't have that domain under this key, the key is from a different account: add the domain again and publish the records it shows. Your sender details are kept. Pasting back the exact key that's already saved keeps everything as it was.
More in Campaigns
- Track link taps and see what convertsEvery link HyperDM sends is tracked. Here is where the taps show up — the Automations list, sent broadcasts and Analytics — and how to read them honestly.Read
- BroadcastsSend a one-off message to opted-in contacts in four steps: compose, choose the audience, decide on the 24-hour window and schedule it.Read
- SequencesBuild a drip campaign: steps and waits, the send window, how people join and leave, and why every send still passes the compliance gate.Read
Try HyperDM for free
50 free conversations a month, no card. Connect Instagram and follow the guide you just read.